

Windows sleep mode is a great way to save battery juice while still ensuring you can resume your work without wasting power. But what can you do if your computer sleeps randomly between your working sessions? With so many reasons coming into action, it’s a tricky issue to diagnose.

The process gets more complicated since computer makers use different settings. The best way to fight this issue is to try multiple fixes. Check out all the troubleshooting methods to help you fix a Windows 11 PC that goes to sleep randomly.
Why Is the Computer Going to Sleep Randomly
Is your Windows 11 PC going to sleep randomly? There are multiple reasons why this distressing behavior could be happening. Let’s check a few most common ones before getting into the solutions:
- Your PC might be going to sleep randomly because of misconfigured power plan settings.
- The problem can occur if you are using an outdated graphics driver.
- Any product with strong magnetic power near your computer can also be the reason behind the issue.
Fortunately, it’s a prevalent problem and can easily be cured. Here are all the working solutions you can try to fix your computer.
1. Change the Power Plan
If your computer is randomly going to sleep, chances are there’s something wrong with the power plan settings. Windows lets you decide the time after which your computer will go to sleep automatically. If it is set to a very small number, say 1 minute, your computer will automatically go to sleep after being inactive for that time.
To tackle this situation, make sure the Sleep after setting is set to a higher number, like 10 minutes. Here’s how you can change this setting.
Step 1: Press the Windows + I keys shortcut to open the Settings app.
Step 2: Choose System from the left sidebar, and select Power & battery option in the right pane.

Step 3: Click the drop-down icon next to Screen and sleep.

Step 4: Click the drop-down icon next to On battery power, put my device to sleep after option and choose a number of your choice. We recommend choosing 10 minutes.

Step 5: Click the drop-down icon next to When plugged in, put my device to sleep after, and choose 15 minutes from the list.

2. Use the Power Troubleshooter
Windows 11 has many troubleshooters you can use to fix different system issues. A power troubleshooter can come in handy in fixing power issues. To use the Power troubleshooter, follow the below steps.
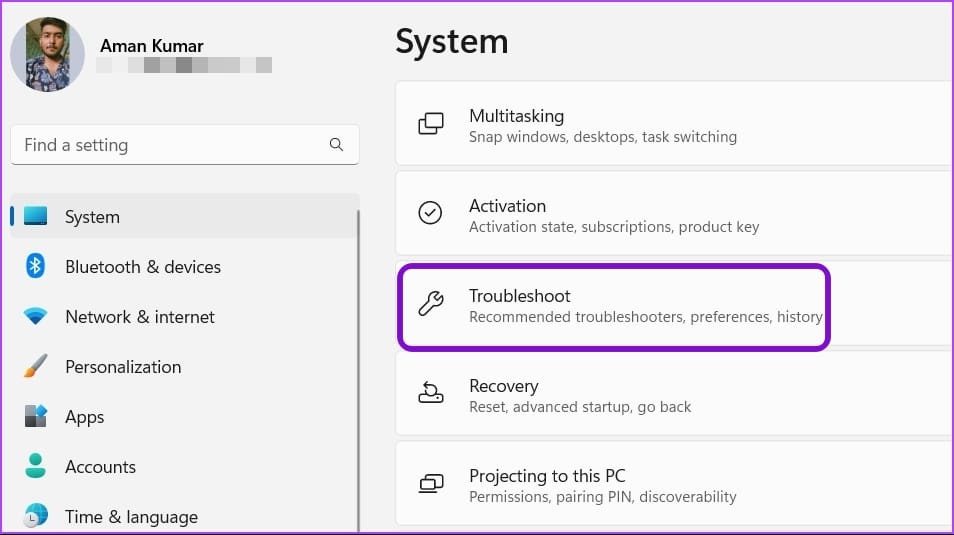
Step 1: Press the Windows + I keys shortcut to open the Settings app, choose System from the left sidebar, and then select Troubleshoot option in the right pane.
Step 2: Select Other troubleshooters.

Step 3: Click the Run button next to the Power option.

A troubleshooter window will appear and scan your computer for any available power issues. If it finds any, it will automatically resolve it.
After the troubleshooting process is complete, restart your computer and check if you are still facing the problem.
3. Download the Latest Windows Update
Microsoft regularly rolls out new Windows updates to introduce new features and fix bugs and glitches. A computer randomly going to sleep issue can result from a bug in the system. Also, if you’re signed up for the Insider builds, it’s a good idea to check and install the latest Insider build for your computer.
So, download the latest Windows update and check if it resolves the problem. Here’s how to do it.
Step 1: Press the Windows + I keys shortcut to open the Settings app, and choose Windows Update from the left sidebar.

Step 2: Click the Check for updates button.

Windows will now look for and download any available updates.
4. Update the Graphics Driver
The driver is an important element that allows your operating system to communicate with the computer hardware. That’s why your graphics card needs the latest driver to ensure your computer can get the best of its capabilities. Whether you update the drivers of your graphics card regularly or not, it’s a good idea to check for the latest one.
Follow the below steps to update the graphics driver on your computer.
Step 1: Press the Windows + X keys to open the Power User menu.
Step 2: Choose Device Manager from the list.

Step 3: Double-click on the Display adapters to expand it.

Step 5: Right-click on the installed graphics driver and choose Update driver.

Step 6: Choose the Search automatically for drivers option.

Windows will now search for available graphics driver updates and download them. After the download is completed, you might need to restart your computer to apply the changes. If your computer can’t install the latest GPU drivers, read our post on uninstalling existing graphics drivers completely before reinstalling the latest ones.
5. Customize the Screen Saver Settings
Windows offers various screen saver options, one of which is the Blank mode. When it is enabled, your computer’s screen will go black and it’ll look like it is in the sleep mode.
So, it could be the case that you misjudged the screensaver with the sleep mode. To fix that, you can disable the screensaver or change the Wait time.
Step 1: Press the Windows + I keys shortcut to open the Settings app, and choose Personalization from the left sidebar.

Step 2: Select Lock screen from the right pane and choose the Screen saver option from the Related settings section.

Step 3: In the Screen Saver Settings window, click the drop-down icon under Screen saver and choose None if you want to remove the screen saver.

You also change timer next to Wait to a higher number if you want to keep the screen saver but don’t want it to get active so quickly.
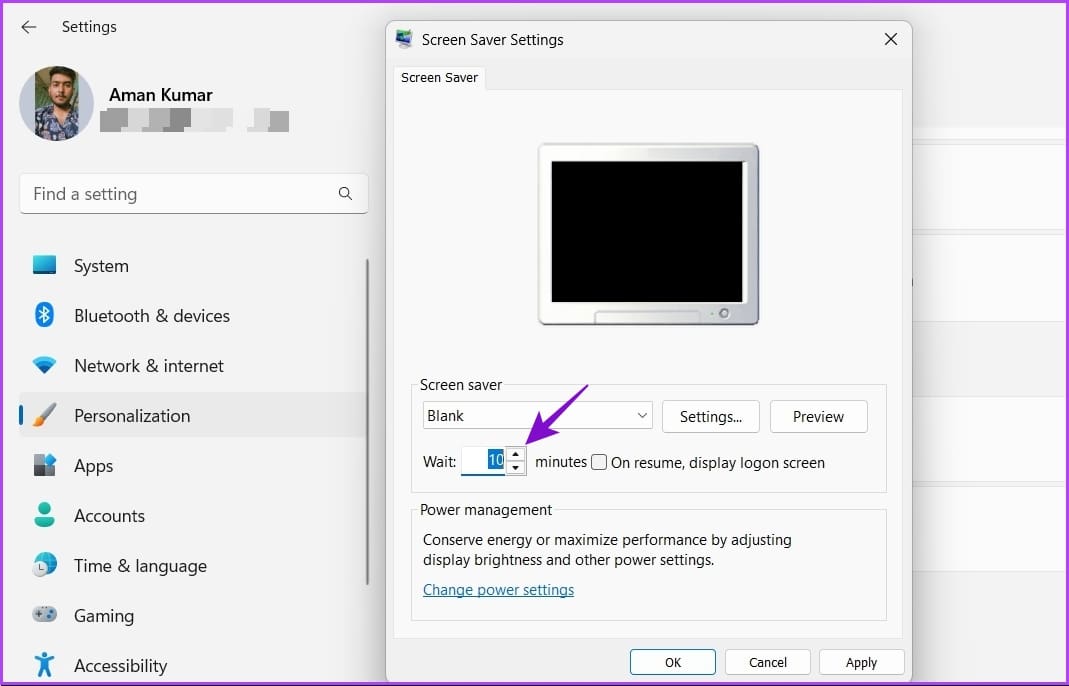
After making the changes, click Apply and then OK to save the settings.
6. Make Changes in the Registry Editor
If the problem shows up after upgrading from Windows 10 to Windows 11, then your computer may not work best with the current power settings that you had for the Windows 10. To fix this, you will have to reset and then reconfigure your power settings.
Before taking the steps, back up the registry, as it will help restore your computer in case something goes bizarre. Of course, you’ll need administrator privileges to make these changes using the Registry Editor. Also, the Registry Editor is not available for Windows 10 Home and Windows 11 Home editions.
Step 1: Press the Windows + R keys to open the Run dialog box.
Step 2: In the Run dialog box, type regedit and press Enter.

Step 3: In the Registry Editor, navigate to the following location:
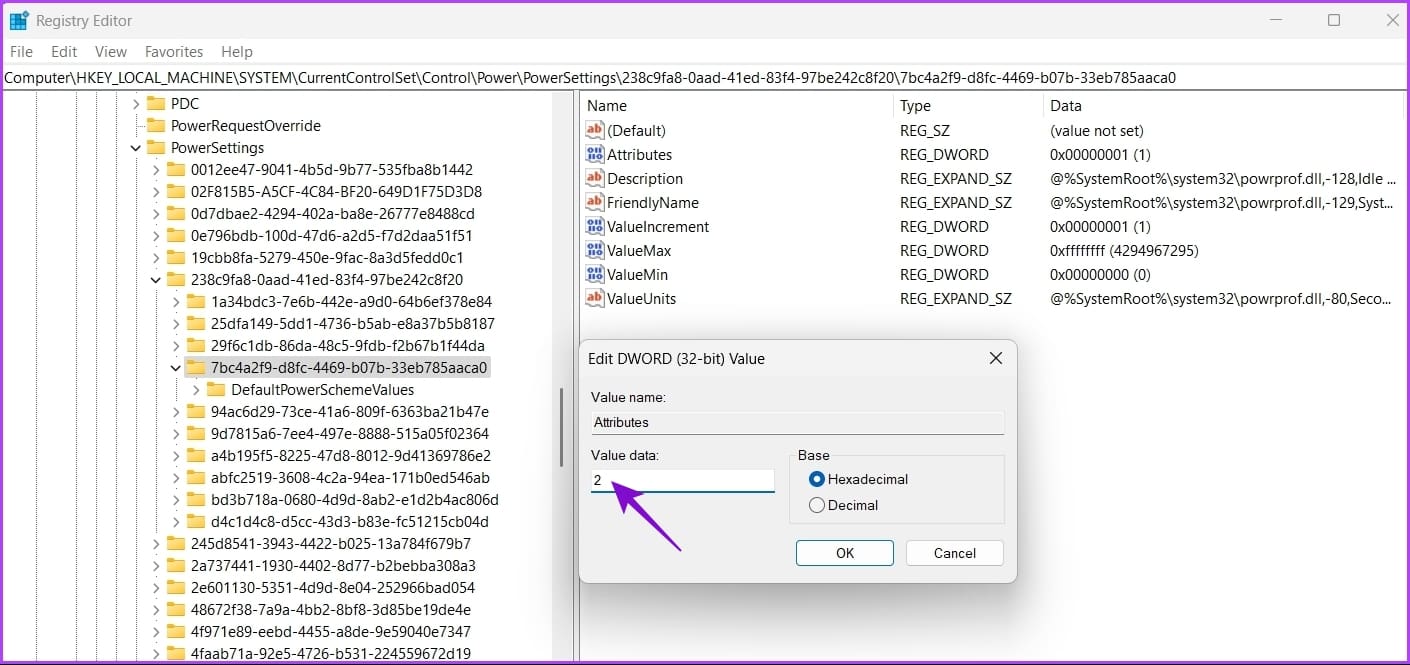
Computer\HKEY_LOCAL_MACHINE\SYSTEM\CurrentControlSet\Control\Power\PowerSettings\238c9fa8-0aad-41ed-83f4-97be242c8f20\7bc4a2f9-d8fc-4469-b07b-33eb785aaca0
Step 4: Double-click the Attributes entry in the right pane.

Step 5: In the Edit window that crops up, type 2 in the Value data section and click OK.
7. Keep the Computer Away From Strong Magnetic Devices
Windows going to sleep randomly issue is common in laptops. This happens when your laptop’s sleep mode is triggered by magnets in nearby devices like smartwatches and smartphones. We know that sounds outlandish but a user figured out the same and posted in Microsoft Community Forum. As it turns out, there are magnets on your laptop’s screen and keyboard part. When you close the lid, the magnetic sensors of your laptop detect the interaction between these magnets and put the laptop to sleep.
Now, if you bring a magnetic device near the correct spot of your laptop, you make the operating system think that the laptop is closed due to the interaction between two magnets. And as a result, the OS puts your laptop into sleep mode. To tackle this situation, the best thing you can do is to remove any electronic device containing magnets away from your laptop.
Altenatively, you can customize the ‘Choose what closing the lid does’ setting in the Control Panel.
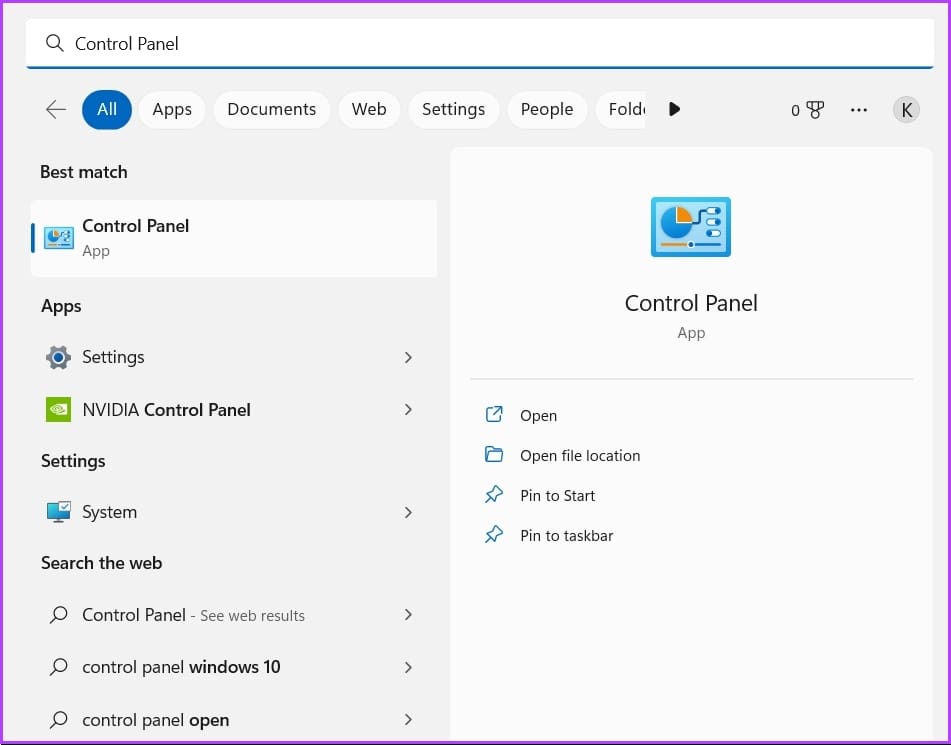
Step 1: Open the Start menu, type Control Panel in the search bar, and press Enter.
Step 2: Choose Hardware and Sound.

Step 3: Select Power Options.
Step 4: Click on ‘Choose what closing the lid does’ option in the left sidebar.

Step 5: Click the drop-down icon next to ‘When I close the lid’ option and choose Do nothing. Select the same option for Plugged in as well.

Step 6: Click the Save changes button.
Enjoy Uninterrupted Working Sessions on Your Computer
Nothing worse than a computer that goes to sleep randomly. Luckily, you can quickly fix this issue using the solutions above. But in the worst-case scenario, you’ll have to reset your computer if nothing works.
Was this helpful?
Last updated on 17 January, 2023
Read Next
 Top 9 Ways to Fix Windows PC Randomly Waking Up From Sleep
Most PC users keep their desktops in sleep mode to be ready to use within a few seconds.
Top 9 Ways to Fix Windows PC Randomly Waking Up From Sleep
Most PC users keep their desktops in sleep mode to be ready to use within a few seconds.
 Top 6 Fixes for Samsung Galaxy Watch Keeps Vibrating Randomly
Typically, your Samsung Galaxy smartwatch should vibrate when you receive a notification.
Top 6 Fixes for Samsung Galaxy Watch Keeps Vibrating Randomly
Typically, your Samsung Galaxy smartwatch should vibrate when you receive a notification.
 8 Best Ways to Fix Mouse Sensitivity Changes Randomly on Windows 10
While mice and keyboards help while working with desktop or laptop, the mouse gets finicky sometimes.
8 Best Ways to Fix Mouse Sensitivity Changes Randomly on Windows 10
While mice and keyboards help while working with desktop or laptop, the mouse gets finicky sometimes.
 Top 7 Ways to Fix Search Menu Keeps Opening Randomly in Windows 11
The Windows 11 Search menu is a powerful tool that allows you to search for files, launch apps, and even perform web searches from your desktop.
Top 7 Ways to Fix Search Menu Keeps Opening Randomly in Windows 11
The Windows 11 Search menu is a powerful tool that allows you to search for files, launch apps, and even perform web searches from your desktop.
 Top 10 Ways to Fix Monitor Goes Black Randomly on Windows
Thanks to neat multitasking add-ons, Windows 11 is a joy on an external monitor.
Top 10 Ways to Fix Monitor Goes Black Randomly on Windows
Thanks to neat multitasking add-ons, Windows 11 is a joy on an external monitor.
 Top 10 Ways to Fix Windows 11 Keeps Rebooting Randomly
You are up for a broken workflow when your Windows 11 PC restarts randomly.
Top 10 Ways to Fix Windows 11 Keeps Rebooting Randomly
You are up for a broken workflow when your Windows 11 PC restarts randomly.
 9 Best Fixes for Honor Band 4 or 5 Sleep Tracking Not Working
Besides keeping track of your steps and calories, fitness bands can track your sleep pattern too.
9 Best Fixes for Honor Band 4 or 5 Sleep Tracking Not Working
Besides keeping track of your steps and calories, fitness bands can track your sleep pattern too.
 7 Best Fixes for Mac Not Asking For Password After Waking Up From Sleep
You can protect your Mac from unwanted user access by securing it with a password or Touch ID.
7 Best Fixes for Mac Not Asking For Password After Waking Up From Sleep
You can protect your Mac from unwanted user access by securing it with a password or Touch ID.
The article above may contain affiliate links which help support Guiding Tech. The content remains unbiased and authentic and will never affect our editorial integrity.

