

Notion is a powerful app that allows you to create, organize, and collaborate on various types of content. This tool lets you easily manage personal projects, team projects, and the operations of your entire company. However, there may be times when you want to delete some of the content or spaces you have created in Notion. This article will show you how to delete workspace and teamspace in Notion.

Why would you want to delete workspace and teamspace in Notion? There could be several reasons for this. Perhaps you don’t need them after finishing a project or leaving a team, or you would like to declutter your sidebar. Maybe you want to start over and create a new workspace or teamspace.
Whatever the reason, deleting workspace and teamspace in Notion is easy and quick. But first, let’s start with the basics.
Difference Between Workspace and Teamspace in Notion
A workspace is a place for organizing information and creating content in Notion for different and separate entities. If you are in a workspace, you can see the pages and databases that belong to it. These (permitted) pages inside a workspace are called teamspace.

A workspace can have multiple teamspaces. These teamspaces are dedicated areas for different teams within the organization. They can be open, closed, or private, depending on the level of visibility and permission desired.
Now that you know the basic difference between a workspace and a teamspace, it is necessary to know certain things before deleting a Notion teamspace.
Also Read: How to create and use backlinks in Notion
Things to Know Before Deleting Teamspace in Notion
Before deleting a teamspace in Notion, here are some important things to know:
- Deleting a teamspace in Notion will result in permanent data loss. This includes all the content within it, including pages, documents, databases, and files, and you cannot recover them.
- Deleting a teamspace will remove all team members access to the content within it. If your team relies on the information or actively collaborates on projects within the teamspace, deleting it will disrupt ongoing work and communication.
- If your teamspace is connected to any integrations or third-party services, deleting it may affect those integrations.

- Deleting a teamspace will revoke permissions and associated access. The deletion will remove any shared access or specific permissions that team members or guests had within the teamspace.
- If, in case, the pages within the teamspace are linked to other pages or databases in your workspace, deleting the teamspace might result in broken links. Make sure to review and update any dependencies to avoid losing important connections.
Above are some of the things you must know before deleting a teamspace. If you are wondering, leaving and deleting a Notion teamspace is not the same; keep reading.
Difference Between Leaving and Deleting a Teamspace in Notion
When you leave a teamspace, you are no longer a member of it, so you cannot edit or access its content. However, it is critical to note that leaving a teamspace does not affect other members or the teamspace itself.

Whereas deleting a teamspace means permanently removing the teamspace and all its content from Notion. This includes pages, documents, databases, and any data within the teamspace. Moreover, deleting a teamspace cannot be undone and affects all members who can no longer access it. Let’s jump to the steps now.
Also Read: How to use Notion as a planner
How to Delete Workspace in Notion on Desktop
Deleting a workspace in Notion is permanent; there is no way to recover the deleted content. So, ensure you have backed up any important information before deletion before following the steps below.
Step 1: Open the Notion app or web on your Windows or Mac computer and go to ‘Settings & members’ from the left pane.
Note: Ensure you are in the correct workspace before moving to the next step.

You will land on the Members section under the Settings page.
Step 2: Go to Settings under the Workspace section from the left pane.

Step 3: Scroll to the Danger Zone section in the right pane and click the ‘Delete entire workspace’ button.

Step 4: In the pop-up, type the workspace name you want to delete and click ‘Permanently delete workspace.’

That’s it. You will be moved out of the workspace immediately, and all the pages included will be deleted. Unfortunately, Notion doesn’t let you delete the workspace from its mobile app.
That said, if you don’t want to delete a workspace but instead want to leave it, you can do so even through Notion mobile app, and the process is simpler; keep reading.
How to Leave a Workspace in Notion Instead of Deleting It
Leaving a workspace rather than deleting it (provided you are the workspace owner) offers several benefits. The two most important reasons are;
- Leaving a workspace keeps the collaboration history, enabling you to revisit discussions, comments, or changes made by team members.
- You can quickly rejoin the workspace in the future whenever you want without disrupting the workflow of others.
Leaving a Notion workspace offers convenience, accessibility, and organization without permanently erasing your data. Let’s show you the steps for desktop as well as smartphone.
On Desktop
Step 1: Launch the Notion app on your Windows or Mac computer and click on the workspace name in the top left corner.
Step 2: From the drop-down menu, select the workspace you want to leave.

Step 3: Go to the ‘Settings & member’ option in the left pane.
You will be navigated to the Member section under the Settings screen.

Step 4: Go to Settings under the Workspace section from the left pane.

Step 5: Scroll to the Danger Zone section in the right pane, and click the Leave workspace button.
Note: If you are a workspace owner, you will see the Leave workspace option next to the ‘Delete entire workspace’ option.

Step 6: In the pop-up, select Leave to confirm.

That’s about it. You will be immediately removed from the workspace and lose access to any content on the workspace.
Also Read: Notion vs. Trello: Which project management tool is better
On Notion Mobile App
Step 1: Launch the Notion app and tap on the workspace name in the top left corner.
Step 2: From the bottom sheet, choose the workspace you want to leave.

Step 3: Once in the workspace, tap on the Members option.
Step 4: In the Members screen, tap on the chevron (down arrow) icon next to your account.
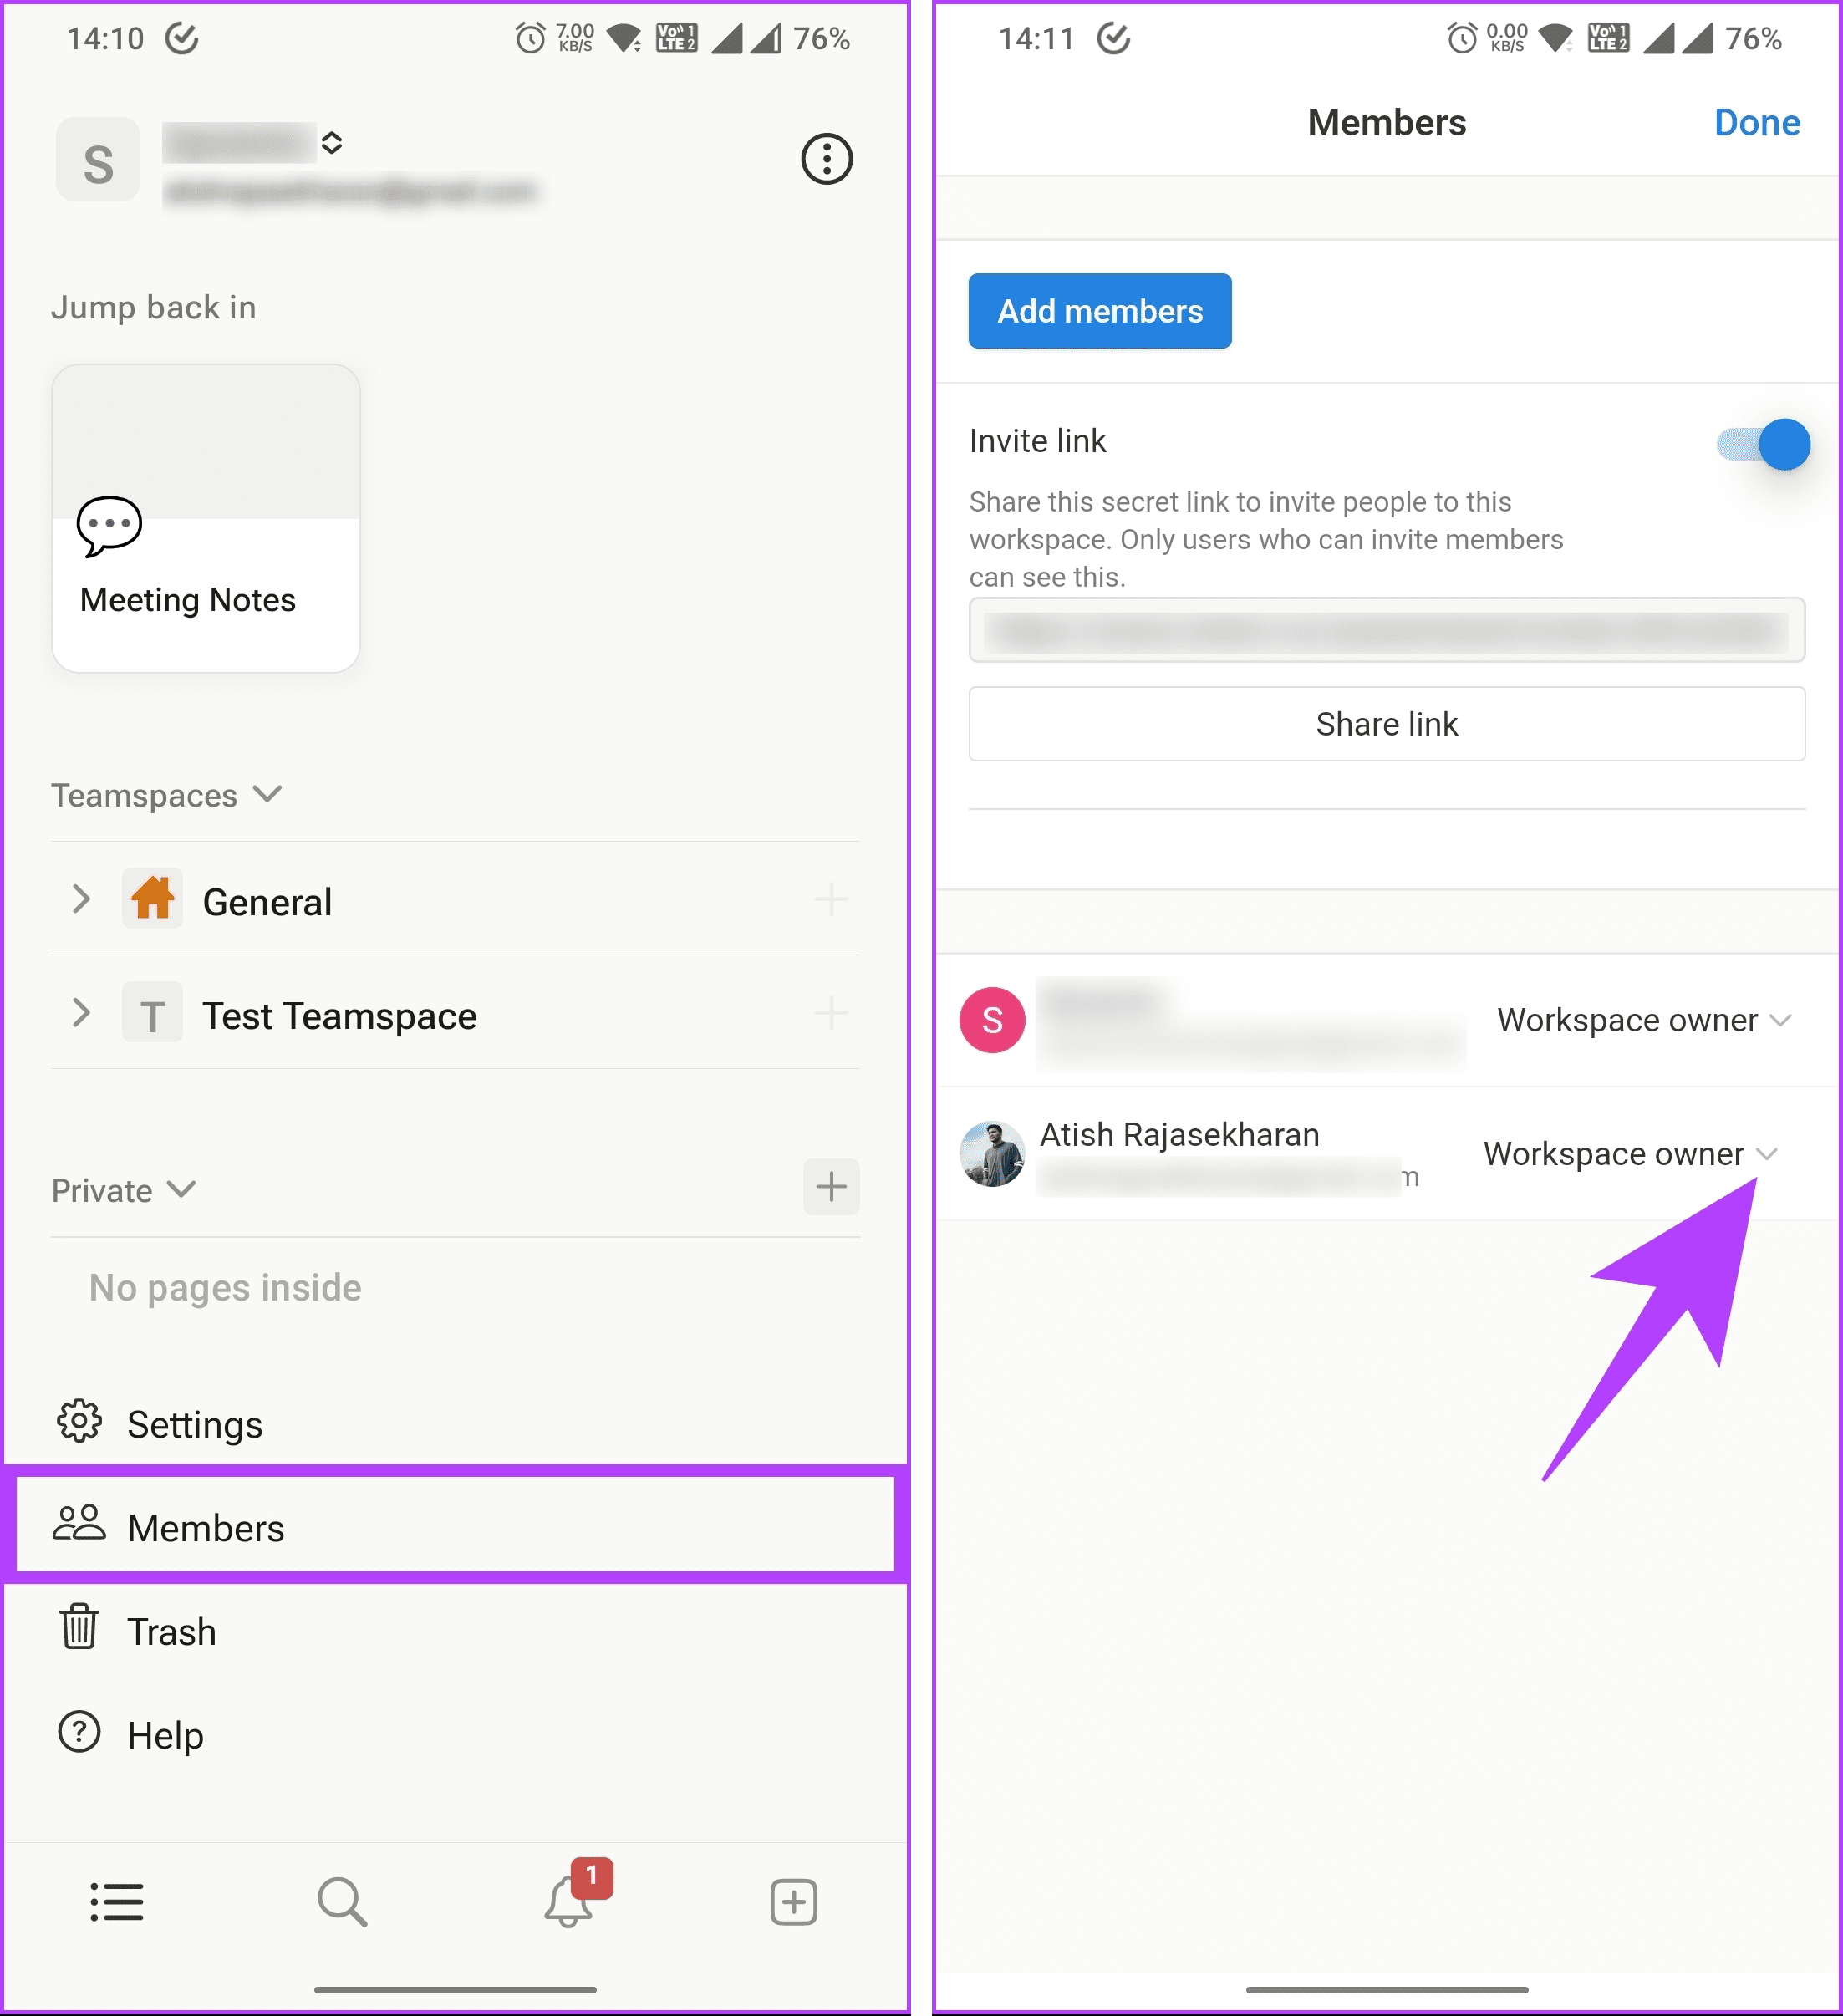
Step 5: From the bottom sheet, choose Leave workspace, and in the pop-up, tap Remove to confirm.

There you go. You will be returned to your default account and lose access to the workspace you once were part of.
Also Read: Notion vs. Airtable: Which modular tool is better
How to Leave Notion Teamspace
Notion teamspace enables multiple users to collaborate within a shared workspace. However, there may come a time when you need to leave a Notion teamspace, whether because you’re no longer part of the team or you no longer require access to it. Follow the below-mentioned steps.
Step 1: Open the Notion app or website and navigate to ‘Settings & members’ from the left pane.
Note: Ensure you are in the correct workspace before proceeding to the next step.
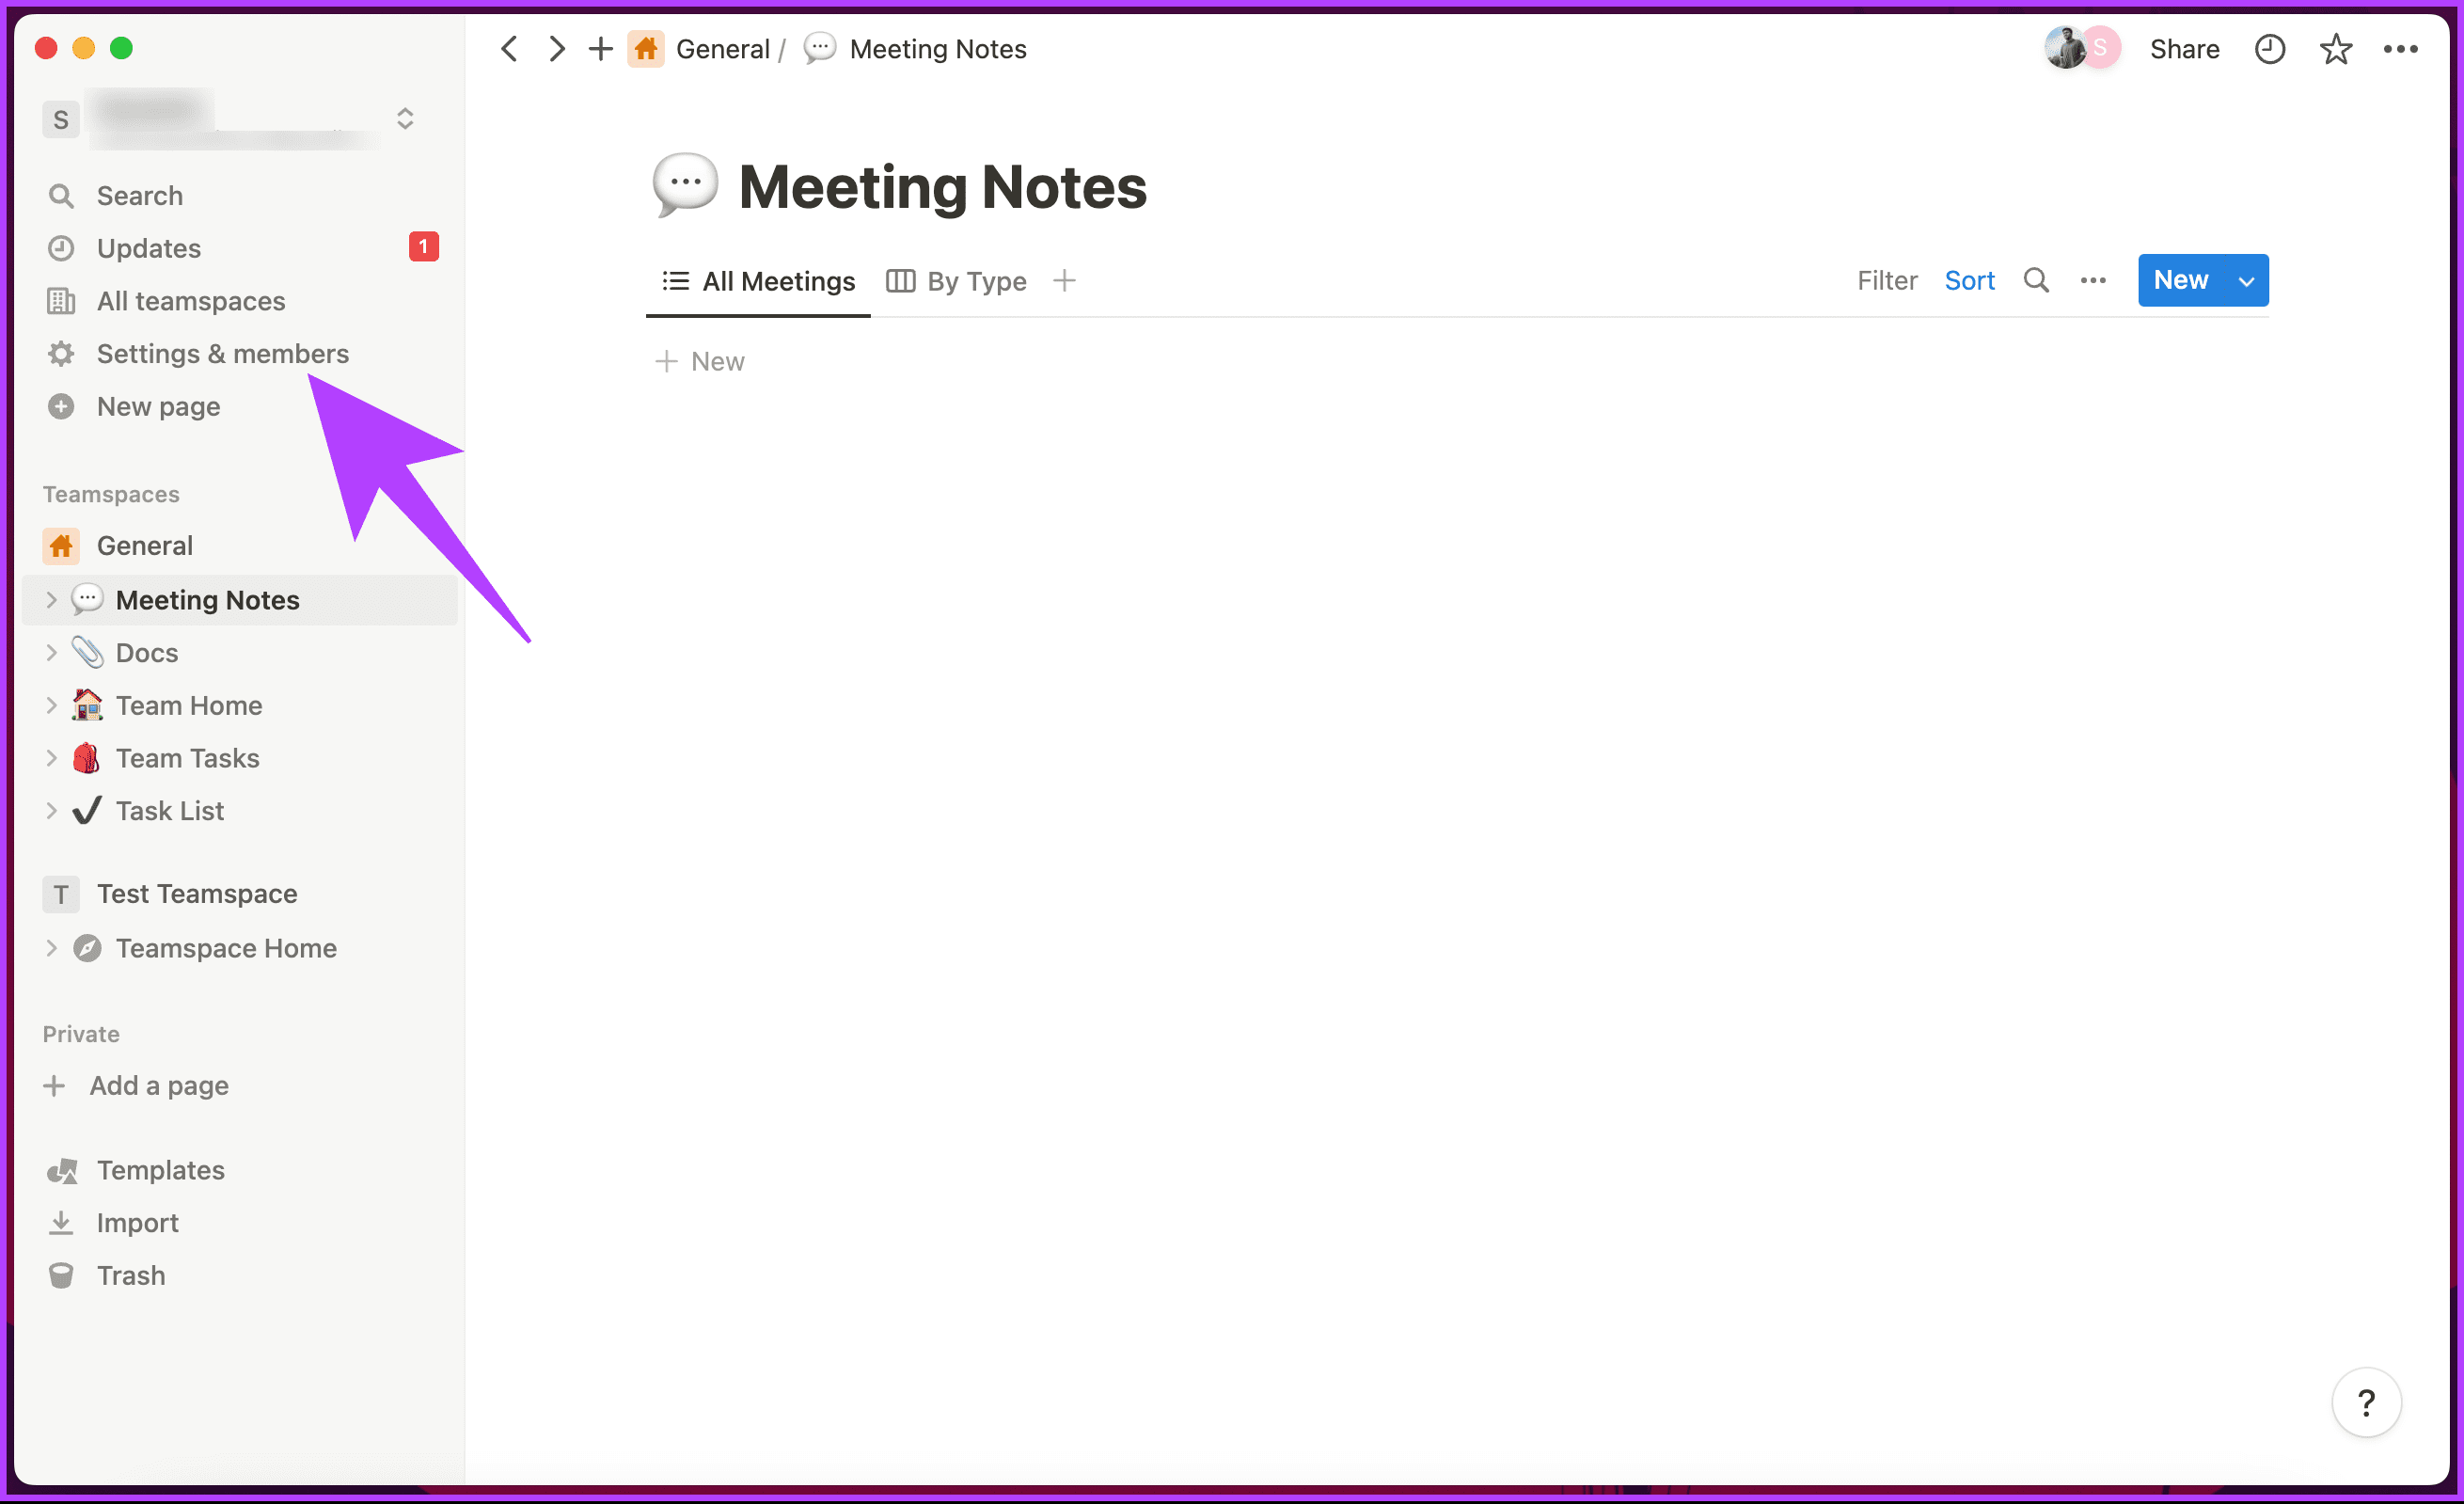
Step 2: Go to Teamspaces under the Workspace section from the left pane.

Step 3: Navigate to the Teamspace you want to leave and click on the three-dot icon.
Note: You cannot leave the default teamspace, which in our case is General.

Step 4: From the drop-down, select Leave teamspace.
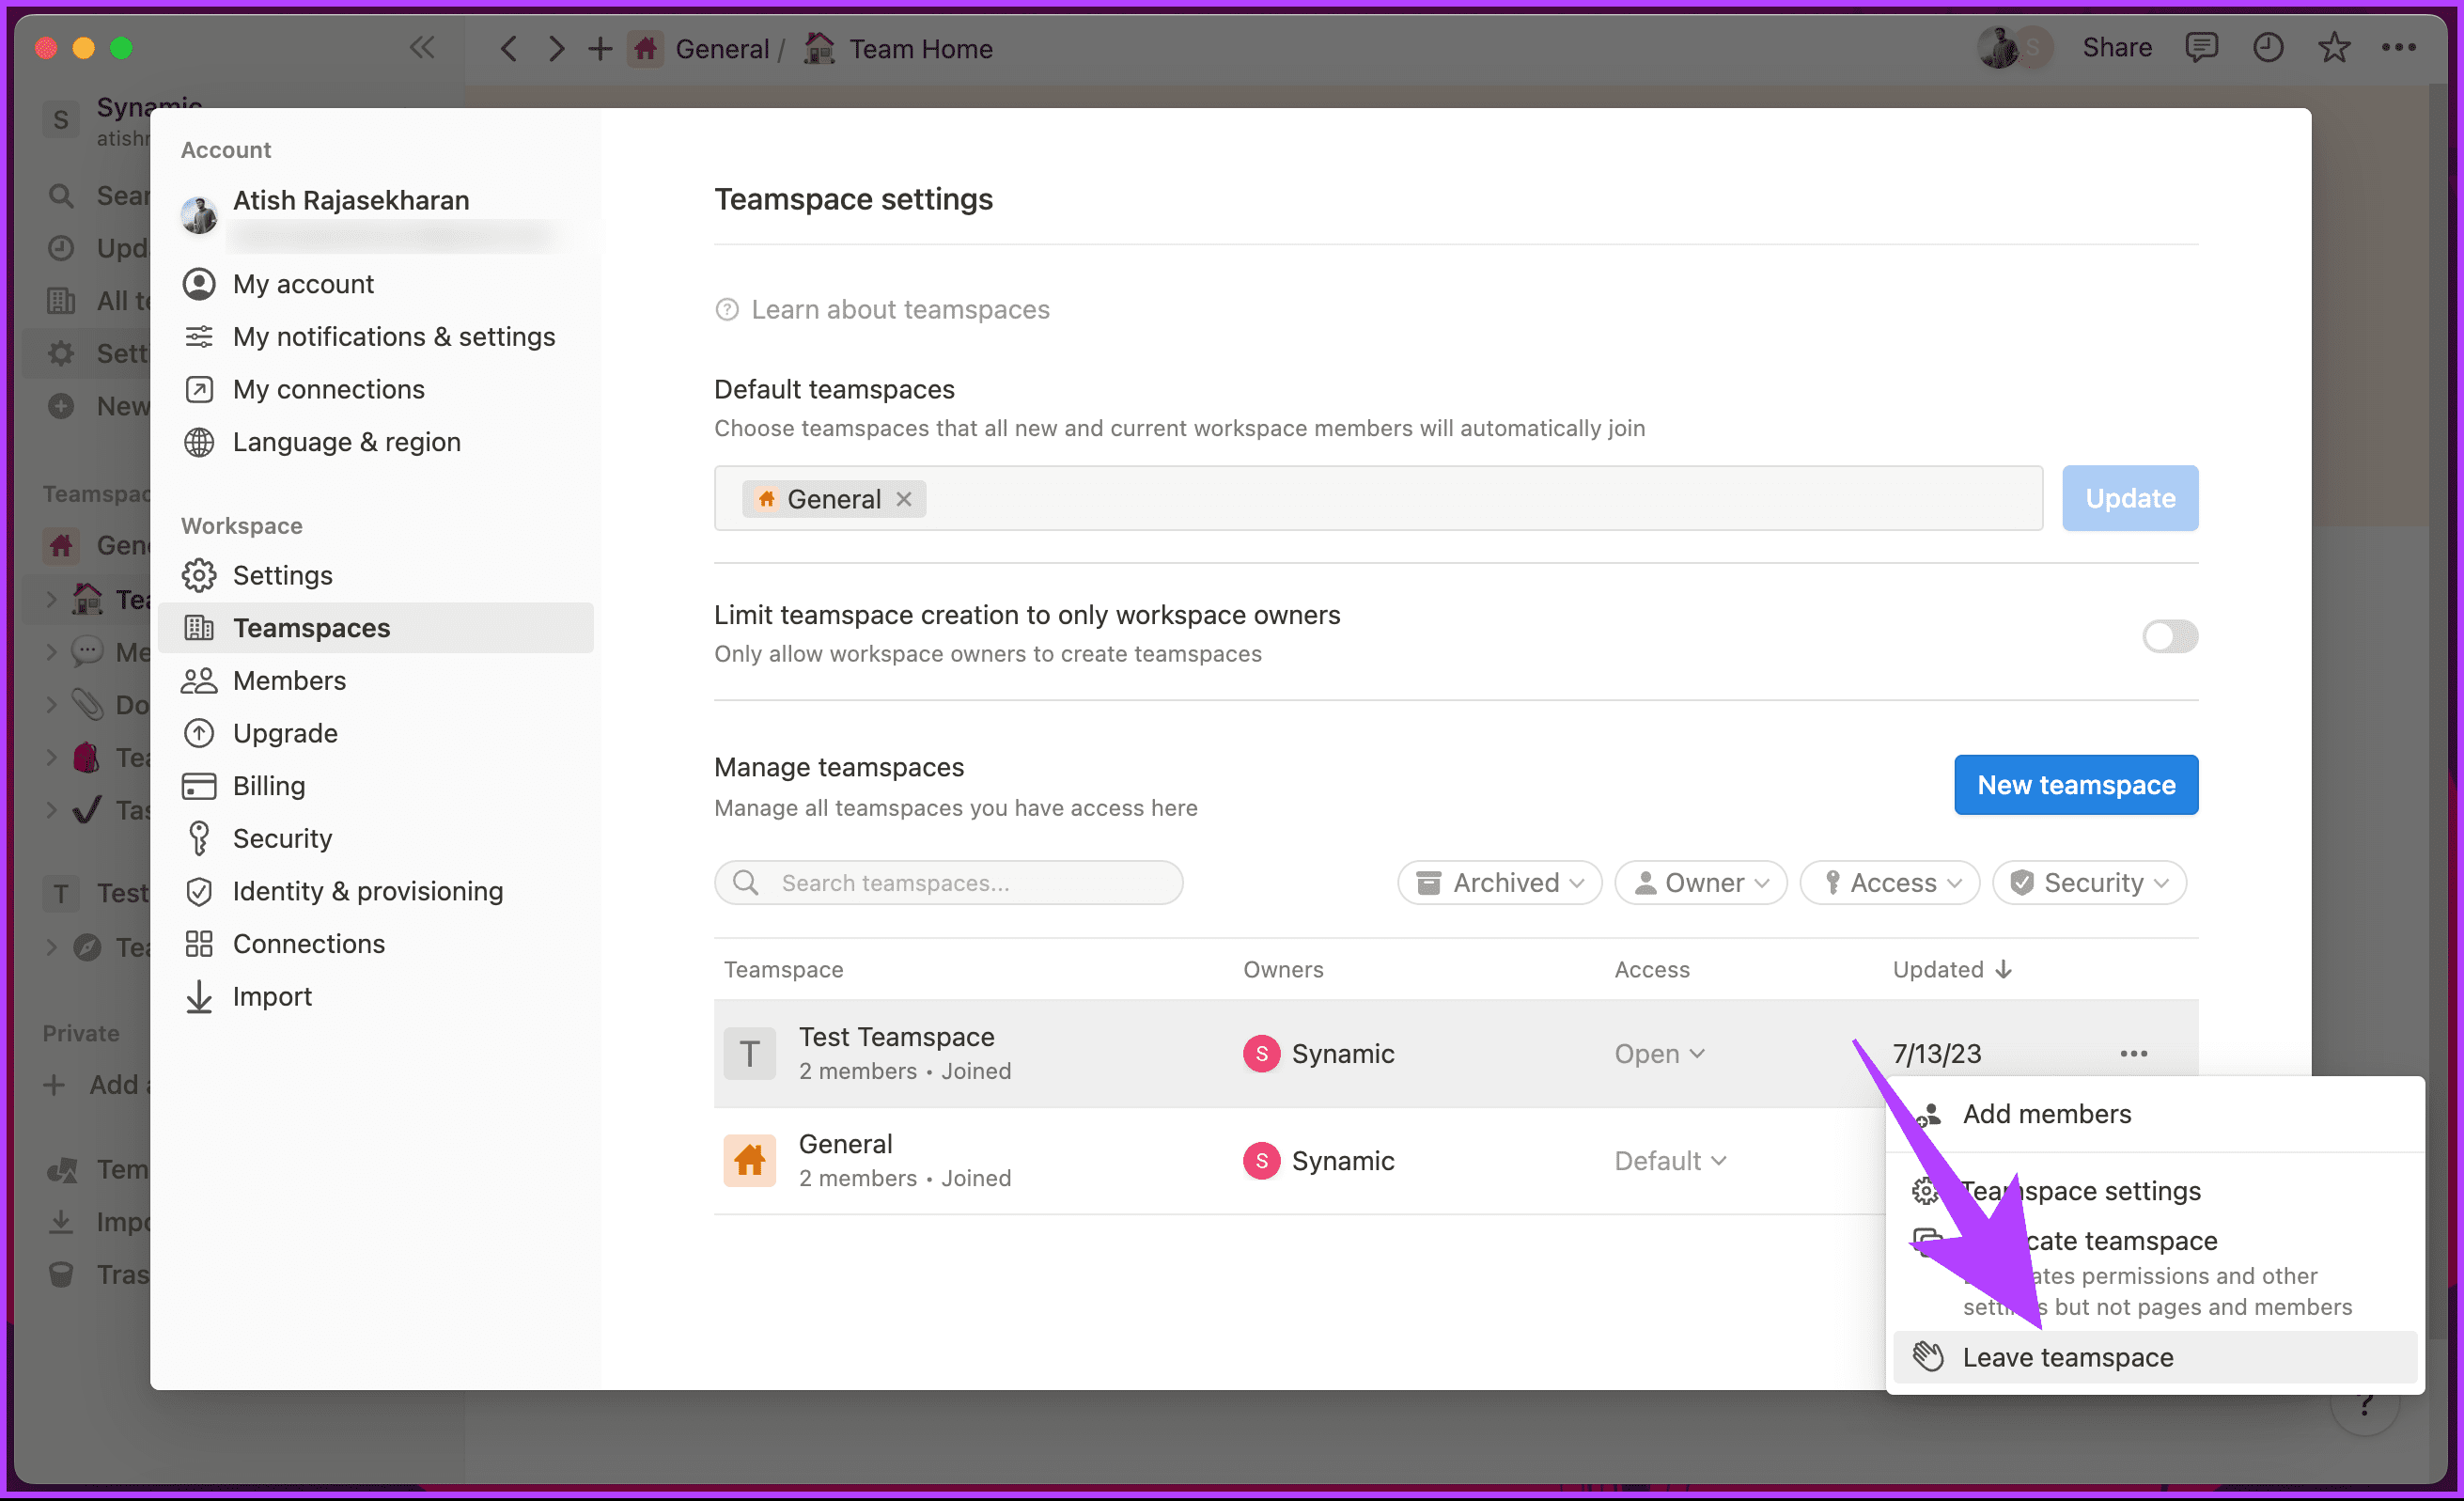
Step 5: In the ‘Are you sure you want to leave [teamspace name]?,’ click Leave Teamspace to confirm.

There you go. You will be out of the teamspace instantly. Do note that you will be connected to the workspace and part of the default teamspace. If you are wondering, there’s no way you can leave a workspace from your Notion mobile app.
If you don’t want to leave the workspace but instead want to archive, continue reading.
How to Archive Teamspace in Notion
What is archiving teamspace in Notion? If you no longer need the content within a teamspace but want to preserve it for reference or historical purposes, consider archiving it instead of deleting it. Archiving allows you to retain content while removing it from active use. Archived teamspaces can still be accessed and searched, but modifications cannot be made.
Archiving a Notion teamspace is pretty straightforward. However, it is vital to note that only administrators or owners of the workspace have the necessary permissions to archive the teamspace. So, make sure you are logged in from the owner account before proceeding with the steps.
Step 1: Open the Notion app or website and navigate to ‘Settings & members’ from the left pane.
Note: Ensure you are in the correct workspace before proceeding to the next step.
Step 2: Go to Teamspaces under the Workspace section from the left pane.
Step 3: Navigate to the Teamspace you want to leave and click on the three-dot icon.
Note: You cannot leave the default teamspace, which in our case is General.
Step 4: From the drop-down, select Archive teamspace.

Step 5: In the ‘Are you sure you want to archive this teamspace?,’ select Archive teamspace to confirm.

There you have it. You have successfully archived a teamspace on Notion. If you change your mind, you can swiftly restore an archived teamspace or delete it permanently.
FAQs on Deleting Teamspace in Notion
No, there is no way to recover a deleted teamspace in Notion from within the app. Once you delete a teamspace, you also delete all its content, and you cannot recover them. However, you may try to contact Notion support if you had accidentally delete a critical teamspace.
No, you can delete a teamspace in Notion only if you own the teamspace and have a paid plan. However, if you are on a free Notion plan, you cannot delete a teamspace but can archive it.
In case you don’t know, archiving a teamspace will make it disappear from your sidebar and workspace list. However, it will not delete its content or members. You can always unarchive a teamspace if you want to reaccess it.
Ditch Notion Workspaces
By knowing how to delete workspace and teamspace in Notion, you can free up some space, simplify your workflow, or start over with a new idea. You may also want to read how to delete your Notion account.
Was this helpful?
Last updated on 14 July, 2023
Read Next
 Notion vs OneNote: Should You Switch to Notion
Microsoft OneNote has been around for about 15 years now and is one of the most powerful note-taking apps.
Notion vs OneNote: Should You Switch to Notion
Microsoft OneNote has been around for about 15 years now and is one of the most powerful note-taking apps.
 How to Leave a Slack Workspace on Desktop or Mobile
Are you feeling overwhelmed with the number of Slack workspaces you've joined?
How to Leave a Slack Workspace on Desktop or Mobile
Are you feeling overwhelmed with the number of Slack workspaces you've joined?
 How to Delete Notion Account on Desktop and Mobile
Looking to close your Notion account and move on?
How to Delete Notion Account on Desktop and Mobile
Looking to close your Notion account and move on?
 Dropbox Paper vs Notion: Which One Should You Choose
The traditional note-taking apps like Evernote are stuck in a rut.
Dropbox Paper vs Notion: Which One Should You Choose
The traditional note-taking apps like Evernote are stuck in a rut.
 Top 9 Notion Tips and Tricks for Students
Notion's modular and customizable project management approach aims to redefine the productivity space.
Top 9 Notion Tips and Tricks for Students
Notion's modular and customizable project management approach aims to redefine the productivity space.
 Notion vs Trello: Which Project Management Tool Is Better For You
Using modular productivity-boosting solutions such as Notion, Coda, and Airtable may look like a challenge initially.
Notion vs Trello: Which Project Management Tool Is Better For You
Using modular productivity-boosting solutions such as Notion, Coda, and Airtable may look like a challenge initially.
 8 Best Notion Templates for Business
The modular productivity space is heating up.
8 Best Notion Templates for Business
The modular productivity space is heating up.
 8 Best Notion Templates for Work
With seamless sharing and collaboration capabilities, Notion to continues to slide from a personal database tool to something you would use at work.
8 Best Notion Templates for Work
With seamless sharing and collaboration capabilities, Notion to continues to slide from a personal database tool to something you would use at work.
The article above may contain affiliate links which help support Guiding Tech. The content remains unbiased and authentic and will never affect our editorial integrity.

