Let’s face it, Apple Maps is not the most popular navigation app out there. However, it is playing catch up with its competitors quite nicely. Gratefully, Apple added another missing key feature, multiple stops on a route recently. So, let’s check out how you can add multiple stops in Apple Maps on iPhone, iPad, and Mac.
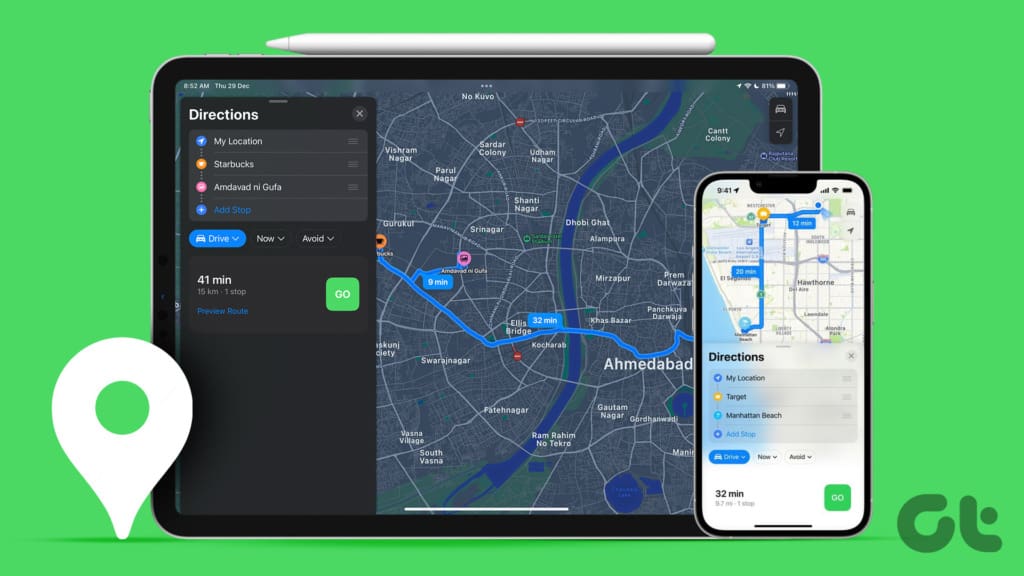
The relatively new feature was released with iOS 16, iPadOS 16, and macOS Ventura. So, you can add up to 15 destinations (i.e. up to 14 stops) in Apple Maps from your iPhone, iPad, and Mac. Once enabled, it will navigate you stop-by-stop. A perfect companion for a road trip or a short visit to a new city, especially if you’re using the Apple Maps Guide feature.
Note: Directions to multiple stops aren’t available in all countries or regions. Check out Apple’s support page to see if your region is included or not.
How to Add Multiple Destinations in Apple Maps on iPhone and iPad
While using an iPhone or an iPad, you can create an Apple Maps multi-stop route before you start the navigation and even while you’re driving to one of the destinations. Both methods are detailed below.
Method 1: Create Route With Multiple Stops Before Starting the Navigation
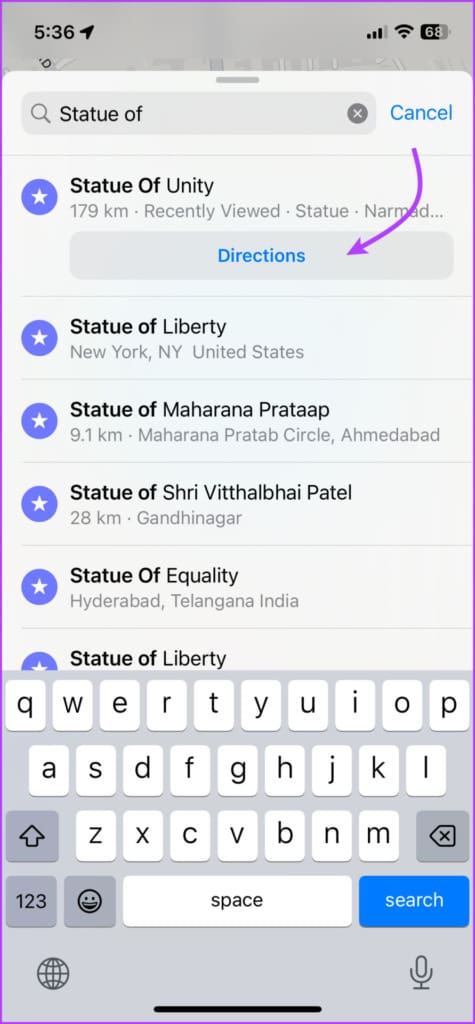
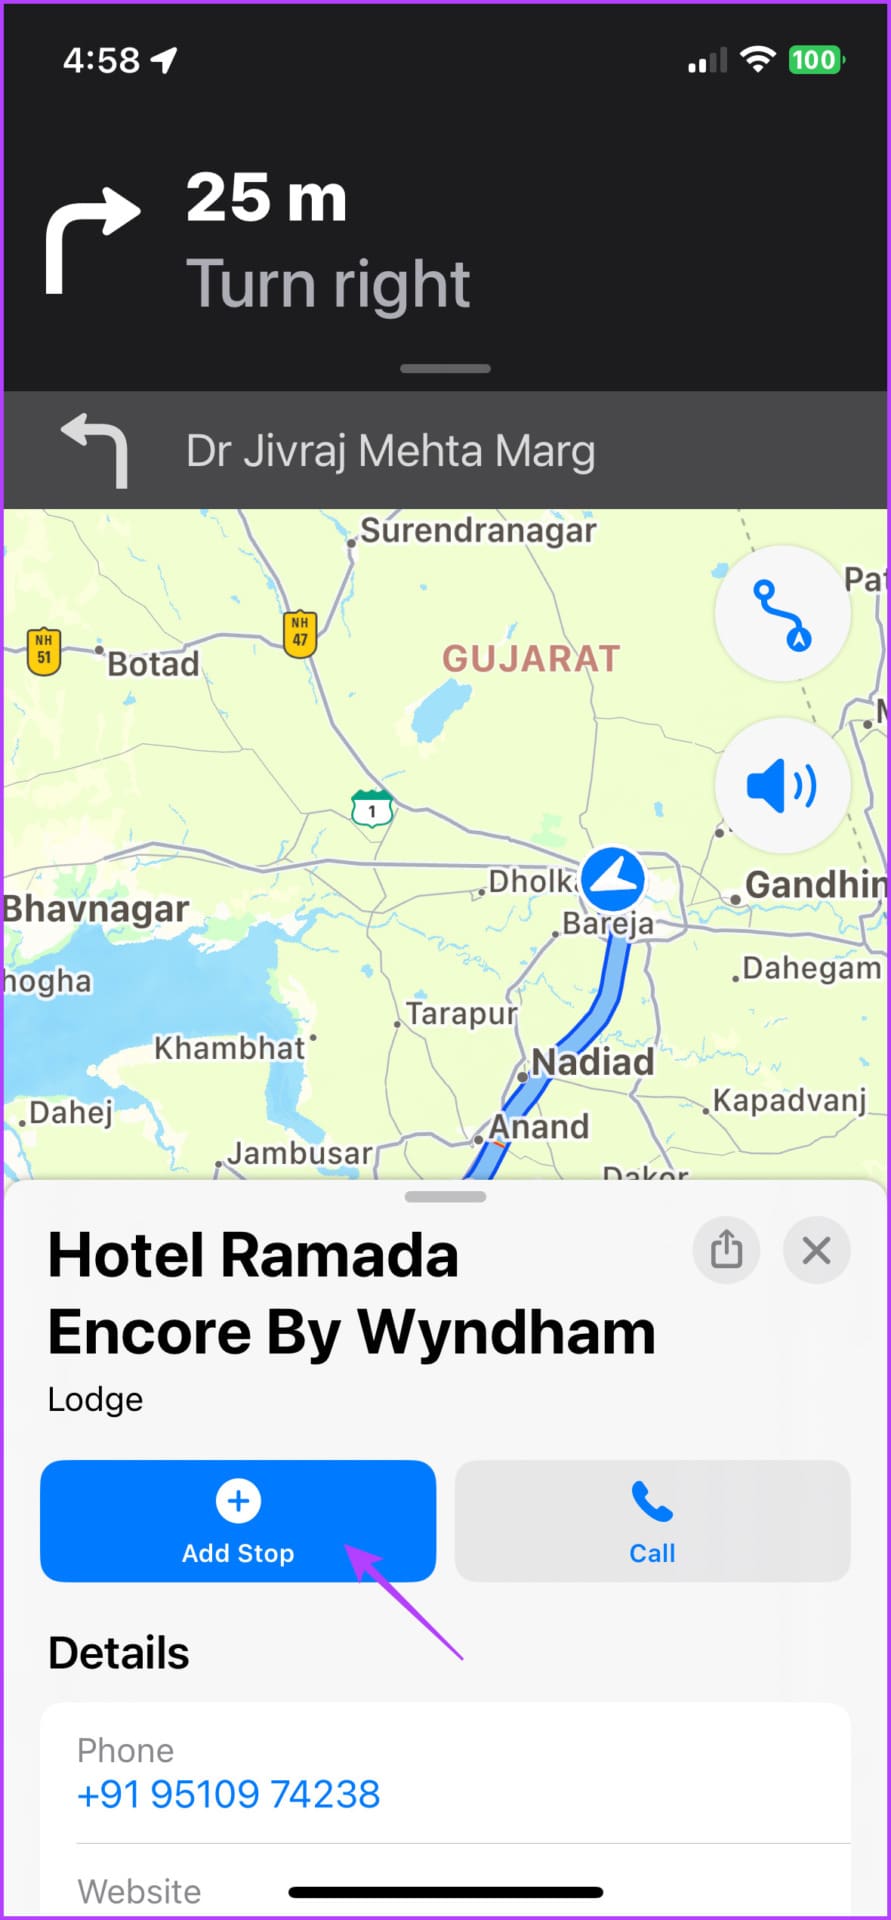
Step 1: Launch Apple Maps and tap the search bar to search for your destination.
Step 2: Select the destination from the results. If available, tap Directions or the car icon.

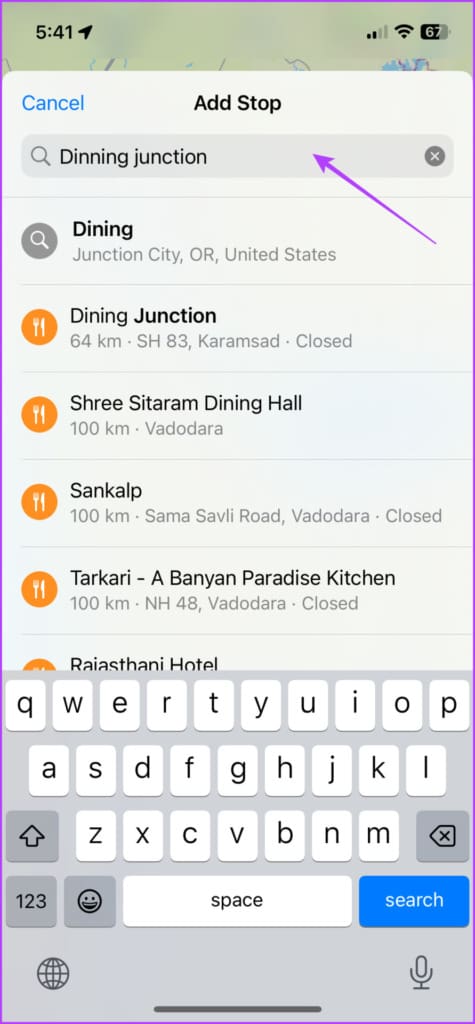
Step 3: Tap + Add Stop.
Step 4: Now, search and select the stop you want to add.

You can also,
- Add more stops: Repeat steps 3 and 4 to Add more stops.
- Change stops: Simply tap the stop, search and select another location.
- Rearrange stops: Tap, hold and drag the hamburger (three-line) icon.
Note: Unfortunately, the Maps app does not auto-optimize or set the route from nearest to farthest. You’ll have to manually do that after you add all the stops.


- Delete stops: Swipe left the stop and tap Delete.
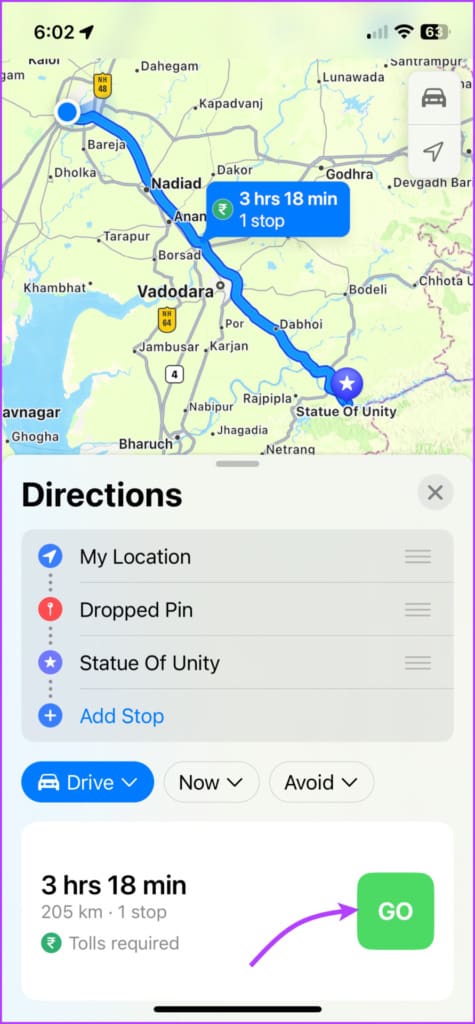
- View the route: Tap the route card (don’t tap Go) to view the detailed turn-by-turn route. Tap Done to return to the map.

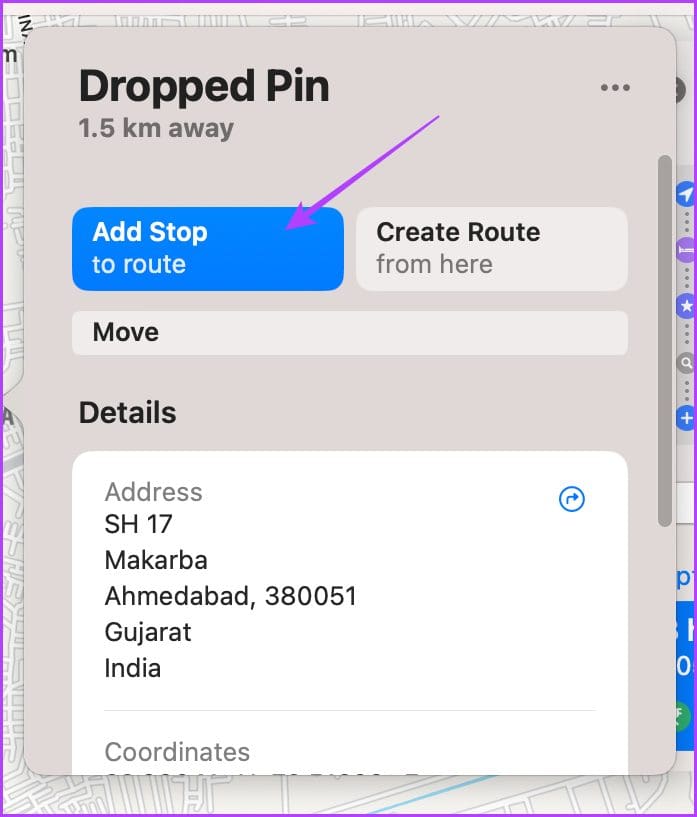
- Add Multiple stops via dropping a pin: Zoom in to the map,
- If a location marker like a restaurant, petrol pump, etc. already exists, simply tap it and then select Add Stop.
- For an unlabeled location, touch and hold it until a pin mark appears. Tap Move to refine the location and Add Stop to add it to your navigation route.


Method 2: Add a Stop on Apple Maps During Ongoing Navigation
Step 1: Launch the Apple Maps app and add your destination.
Step 2: Tap Go to start the navigation.
Step 3: Now, tap or swipe up the route card from the bottom of the screen.

Step 4: Tap Add Stop.

Step 5: Search and select the location you want to add (you can refer to the suggestions provided).


Step 6: Tap Add Stop or Add.
Step 7: Repeat steps 3 to 6 to add more stops.
You can also,
- Remove the stop: Bring up the route card (tap or swipe up) and tap ‘-‘ next to the stop you want to delete.

- Pause or resume directions while stopping: Tap Pause Route or Resume Route.
- Share live ETA: In the route card, tap Share ETA.
Tip: Do you know that you can also send Live ETA automatically on Apple Maps, check out the article for step by step tutorial.
How to Add Multiple Stops on Apple Maps in macOS Ventura
Though you can’t navigate from Apple Maps on Mac, you can create a route and share it with your mobile device or other Apple Maps users.
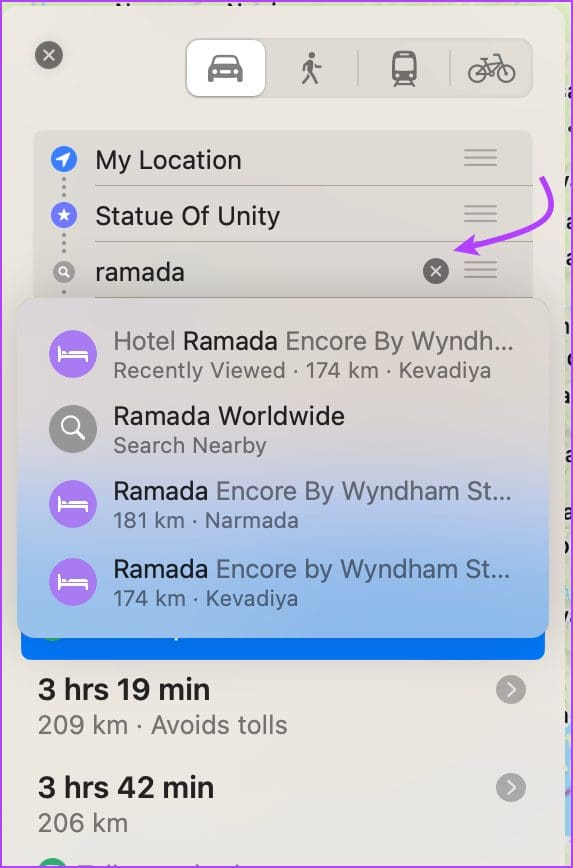
Step 1: Open Apple Maps on Mac.
Step 2: Search the location or select one from the recent places on the sidebar.

Step 3: Click Directions or Create Route depending on the option available.


Step 4: Select + Add Stop.
Step 5: Now, search and select the location you want to add.

Step 6: Repeat steps 3 to 5 to add more stops.
You can also,
- Drop a pin to add a stop: Zoom in on the map, right-click or double-finger click the location, select Drop Pin, and click Add Stop.

- Rearrange stops: Click the Hamburger icon (three-line icon) to rearrange the stops.
- Remove a stop: Hover the cursor over the stop and click X or right-click to select Delete.


- Share the route: Right-click on the distance tag on the maps and select Share to send it to anyone or Send to Device to share it to your iPhone.
FAQs About Adding Multiple Stops on Apple Maps
Simply touch and hold the location until a pin mark appears on your iPhone or iPad or right-click the location and select Drop Pin. Repeat the steps to add as many pins as you want on Apple Maps.
Before you start navigation, tap My Location, search and select the new location. You can also rearrange and switch any stops added with My Location.
You can add stops in iOS 15 while you’re driving by following the steps mentioned above. However, you can’t add any customized locations, just the suggestions shared by Maps.
Plan a Route With Multiple Stops Apple Maps
Apple Maps is surely pulling its socks up. And there are some great Apple Maps features one should try. However, the competition is tough and the competitors are leaps and bounds ahead of Apple’s native application.
What feature do you think can give an edge to Apple Maps? Do you use it or prefer any other navigation app? Share in the comments below.
Was this helpful?
Last updated on 30 December, 2022
Read Next
 How to Share Live Location Using Apple Maps on iPhone, iPad, and Mac
Sharing Live Location helps in tracking the real-time location of family and friends.
How to Share Live Location Using Apple Maps on iPhone, iPad, and Mac
Sharing Live Location helps in tracking the real-time location of family and friends.
 How to Add Multiple Labels on Google Maps
While Google Maps keeps evolving, it lets you add a marker for your home and work location.
How to Add Multiple Labels on Google Maps
While Google Maps keeps evolving, it lets you add a marker for your home and work location.
 How to Change Voice in Apple Maps on iPhone, Apple Watch and Mac
A story that Apple wants you to forget is the launch of Apple Maps.
How to Change Voice in Apple Maps on iPhone, Apple Watch and Mac
A story that Apple wants you to forget is the launch of Apple Maps.
 How to Switch Between Multiple Apple IDs on iPhone and iPad
An Apple ID is an essential component of an iPhone.
How to Switch Between Multiple Apple IDs on iPhone and iPad
An Apple ID is an essential component of an iPhone.
 How to Add Signature in Apple Mail app on iPhone, iPad and Mac
Apple devices like iPhone, iPad, and Mac come pre-installed with the Mail app.
How to Add Signature in Apple Mail app on iPhone, iPad and Mac
Apple devices like iPhone, iPad, and Mac come pre-installed with the Mail app.
 5 Best Fixes for Dark Mode Not Working in Apple Maps on iPhone and Mac
Apple Maps lets you navigate your daily commute by giving the shortest routes to your destination on time.
5 Best Fixes for Dark Mode Not Working in Apple Maps on iPhone and Mac
Apple Maps lets you navigate your daily commute by giving the shortest routes to your destination on time.
 How To Add or Change Home Address in Apple Maps on iPhone
If you plan to go on a road trip or just run some errands, you can add multiple stops in Apple Maps on your iPhone.
How To Add or Change Home Address in Apple Maps on iPhone
If you plan to go on a road trip or just run some errands, you can add multiple stops in Apple Maps on your iPhone.
 Apple Maps vs. Google Maps: Which App Is Better
Whether to find our way, discover new places, or avoid traffic, we often use a navigation app.
Apple Maps vs. Google Maps: Which App Is Better
Whether to find our way, discover new places, or avoid traffic, we often use a navigation app.
The article above may contain affiliate links which help support Guiding Tech. The content remains unbiased and authentic and will never affect our editorial integrity.

